Noncompliant ADA Facilities – Playground Access – How would you fix it?

Noncompliant curb ramp at a park

The other day I was visiting a community in Illinois for the day and met a local person  who was very excited about the new playground equipment being installed in his neighborhood. He encouraged me to check it out since he said it was the first time the community had upgraded the site since his children, who are now adults, had been little. So I took a walk to the park only to find unfortunately we are still not constructing ADA compliant facilities decades after laws and guidance have been in place to assist us in these efforts.

Noncompliant curb ramp at a park

I’ve included the photos I took of the site showing the designer seems to have intended to install two accessible points off the shared use path running adjacent to the playground (the skidsteer is parked on the path). As you can see in the photos, one ramp, in the photo directly above and below, has side slopes down to the ramp which are not compliant with the 10:1 slope. The other is a ramp, shown in the very first photo, which has side slopes leading down from the ramp at an angle which are much steeper than the 10:1 ratio. This ramp also seems to have a much steeper running slope than 12:1 slope at the very end for the last 6 to 12 inches. Each ramp as constructed has areas where a wheelchair could tip due to the steep slope.

Noncompliant curb ramp in the park

I first thought perhaps the designer was worried putting in the required 10:1 slopes (see image below showing standard) could cause the ramp to be moved over and conflict with a swingset. So I asked myself, how would I have designed it, and how would I fix this now? I like asking this when I see something I think is noncompliant because sometimes achieving compliance can be a real challenge – sometimes there is not always an easy solution. Understanding how others have approached design challenges helps me become a better designer.

Curb ramp side slopes from ADA Standard 2010
Curb ramp side slopes from 2010 ADA Standards

However, at this particular site, I believe there is a much better design that would be a lot safer and provide even more accessibility. Once I realized this, I wondered why the original designer had not just done it that way in the first place since it seemed a more obvious solution than what had been chosen. And while some of the completed work would have to rebuilt to incorporate my redesign, it would definitely be worth fixing it now before the project is finished if this will be in place for another 20+ years.

I was going to describe what I came up with, but rather than explain what I would have designed, I was curious, what would be your fix?


Share

Build a Kit- Flashlight/Batteries – Week 7

Build a Kit - Flashlight - Week 7

Last week, the weather radio we purchased came with a flashlight so we would not need to go out and get another one for our kit. We also all have flashlights on our phones. But with eight people, we figured it couldn’t hurt to get a standard flashlight for our kit. Plus Menards has a nice flashlight – a Rayovac® 3-LED Industrial-Grade Flashlight – for only $6.99. It comes with batteries, but we will also pick up a pack of D batteries to throw in the kit.


As a side note, throughout this series of posts about getting prepared, I may mention certain products, services, agencies, etc. At no time is it my intention to promote a specific product or service or agency. Each is mentioned only for informational purposes.  Of course as a government employee, I do receive a salary from the government for the time I work on my job, but I don’t receive any compensation from any commercial entities I mention or include in these posts.

Share

Build a Kit – Weather Radio – Week 6

Build a Kit - Weather Radio

This week we are going to focus on making sure we know what is going on during an emergency or disaster to help us make good decisions regarding our safety. Emergency preparedness sites recommend using a weather radio to receive notifications and information about a hazardous event. In researching what to buy I quickly discovered there are many choices so the key here is to know what is available then decide what features you believe you will need. There are many sites out there with detailed information so I’m only going to hit the major decision points below:

Portable or stationary? If you think you may need to leave your home and want to make sure you can continue to receive notifications, you may want to look at a portable radio. Also consider if you want the radio to be weatherproof.

Type of alerts? Some radios offer audible alerts in either one or multiple tones. Some also remain idle then broadcast a tone when an emergency alert is broadcast.

SAME (Specific Alert Message Encoding) technology? This feature determines if you can receive alerts for a specific area rather than from the entire area served by a station.

Channels? Do you want just weather related information or do you also want to listen to news and music assuming those stations would be operating during an event? It is highly recommended by many preparedness sites to buy a radio with the NOAA channel which broadcasts weather information.

Power source? Radios can be operated with many different alternative power sources such as batteries, hand-crank with built-in generator, or solar in addition to being able to use AC or DC power.

Light? Some radios also come with lights to be used as a flashlight.

Cell-phone charger? A few radios offer the ability to charge cell phones.

Cost? You may need to factor in your budget in choosing a radio.

For our family, we definitely want a portable radio with alerts, we are not worried about the SAME technology, we would want all channels including the NOAA channel, and the radio should have multiple power options. We also would like to have the cell-phone charger and of course, we don’t want to spend a lot of money.

Based on our criteria, below were the possibilities I chose to research. I also showed the current prices on Amazon. (Note the links are to the product page on Amazon not because I believe that is the best place to buy the radio, but just as a way for you to get more detailed info on each model.)

It seemed all of the radios above had some really poor reviews, but I figured this is common as all products are going to have some unhappy customers. After reading through reviews of all of the radios, we are choosing the iRonsnow one. It along with the FosPower seemed to have the fewest negative reviews with the least major issues.


As a side note, throughout this series of posts about getting prepared, I may mention certain products, services, agencies, etc. At no time is it my intention to promote a specific product or service or agency. Each is mentioned only for informational purposes.  Of course as a government employee, I do receive a salary from the government for the time I work on my job, but I don’t receive any compensation from any commercial entities I mention or include in these posts.

Share

Build a Kit – Food – Week 5

Build a Kit - Food, 3-day supply

Now that we have our water supply, next on the list is food. The suggestion is to store a 3-day supply of non-perishable food for each person. As I mentioned last week, we have eight people in our family. One is younger than two so the portions for him are probably not going to be the same as for the rest of us who are all adults.

So I did a little research to see what type of food would be best to purchase. Here’s some foods which will last a year or more without spoiling:

  • Nuts and peanut butter
  • Canned or dried meats and seafood
  • Dried grains, fruit, and beans
  • Canned or powdered milk
  • Protein powders
  • Dark chocolate
  • Bouillon
  • Coffee, tea
  • Honey
  • Hard cheese in wax
  • Canned olives
  • Vinegar
  • Salt

Another suggestion is to purchase MREs or Meals Ready to Eat.

For our family, we will end up buying some of all the above foods because it is similar to what we already eat. Like the water, we can rotate foods in and out although it will be on more of an annual basis. The challenge for us will be how much to buy. One method would be to look at calories. We could select foods so that each person would get 2,000 calories a day or 6,000 total for the three days. Another family might choose very different foods depending on allergies. The only allergy we need to accommodate is a gluten sensitivity.

To spread out the cost, we are going to purchase the food the same way we are buying the water – a little each week we shop. So starting this week, we will buy one of the food items above in enough quantity to last our family for three days.

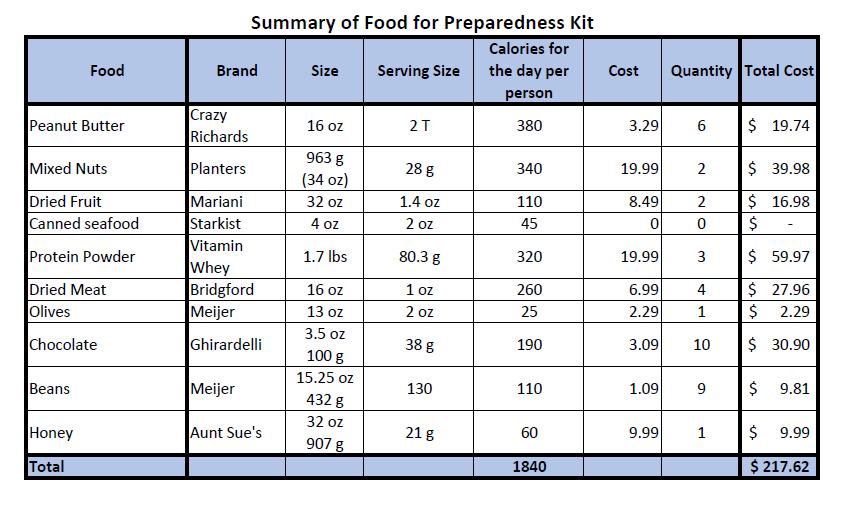
Based on the needed calories and the costs here is our food plan:


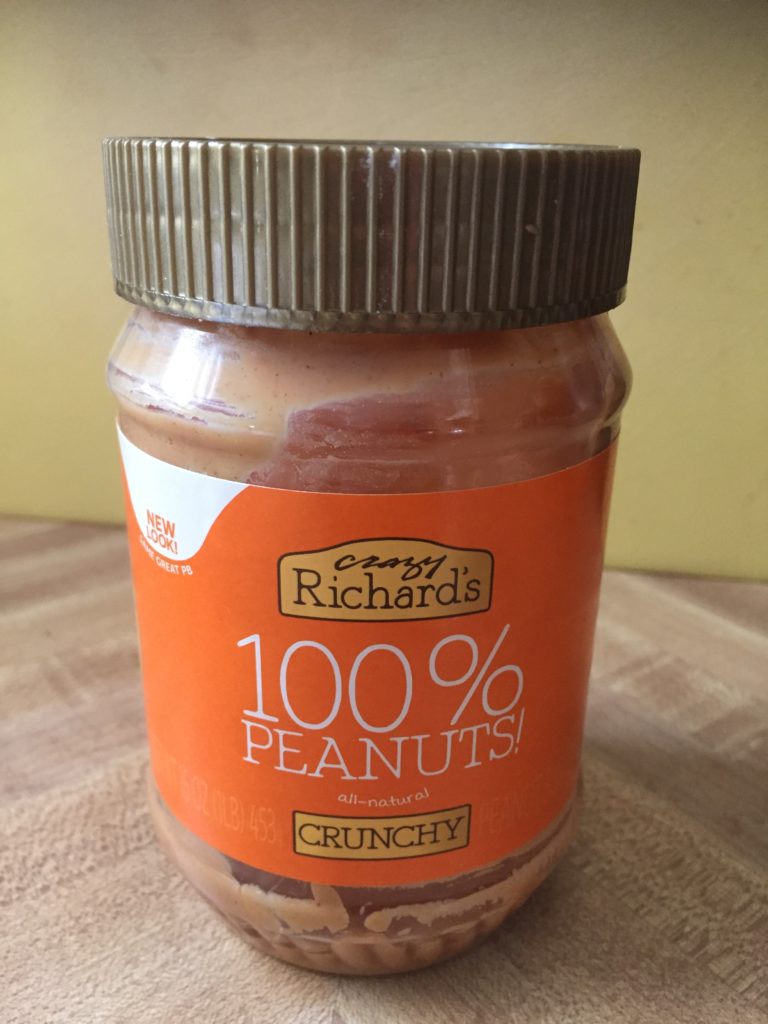
Peanut butter – My family only likes peanut butter which is natural with no additives. So based on brand availability and cost in my area, the cheapest one to buy is Crazy Richard’s 100% Peanuts which is $3.29 for 16 ounces at Meijer.  The jar says 2 tablespoons is a serving (190 calories), and there are 14 servings in a container. That means with seven servings per jar, we could use a jar a day for seven of us if we have one serving a day per person (excluding baby). But to make sure we get enough calories each day I’m going to figure on two servings a day for our family of this food. So we will buy six jars during one of our trips for a total cost of roughly $20.

Peanut Butter jar

Nuts – While a bag of nuts is probably the most inexpensive choice, I am not sure this is the best storage container. So instead of buying a special container, I am thinking I’ll just spend a little more to get nuts in a better container. The one I am going to buy is Planters Deluxe Mixed Nuts – the 34 ounce size. Planters says on their website, a serving of this is 28 grams (170 calories) so if the container contains 963 grams, there are 34 servings in the container. For three days, this provides 11 servings or more than enough for one a day for everyone, although I doubt the baby would be eating nuts. But to make sure we get enough calories each day I’m going to figure on two servings a day for our family of this food. So like the peanut butter, we will add two containers of these nuts to a shopping trip for a total cost of roughly $40.

Dried Fruit – I have somewhat of the same concern over the container for dried fruit, beans, and grains so may end up buying something to store these. For now, I’m going to buy a 32-ounce bag of Mariani’s Mixed Fruit. The Mariani website shows there are 23 servings per bag with a serving size being a quarter cup (110 calories). That means there  is enough in this bag for one serving per person in my family for almost three days. I’ll probably end up buying two of these bags which would give us enough for three days and leave some extra. When they are on sale at Meijer, I can get a bag for $8.49 so that means this will cost a total of almost $17 for the two bags.

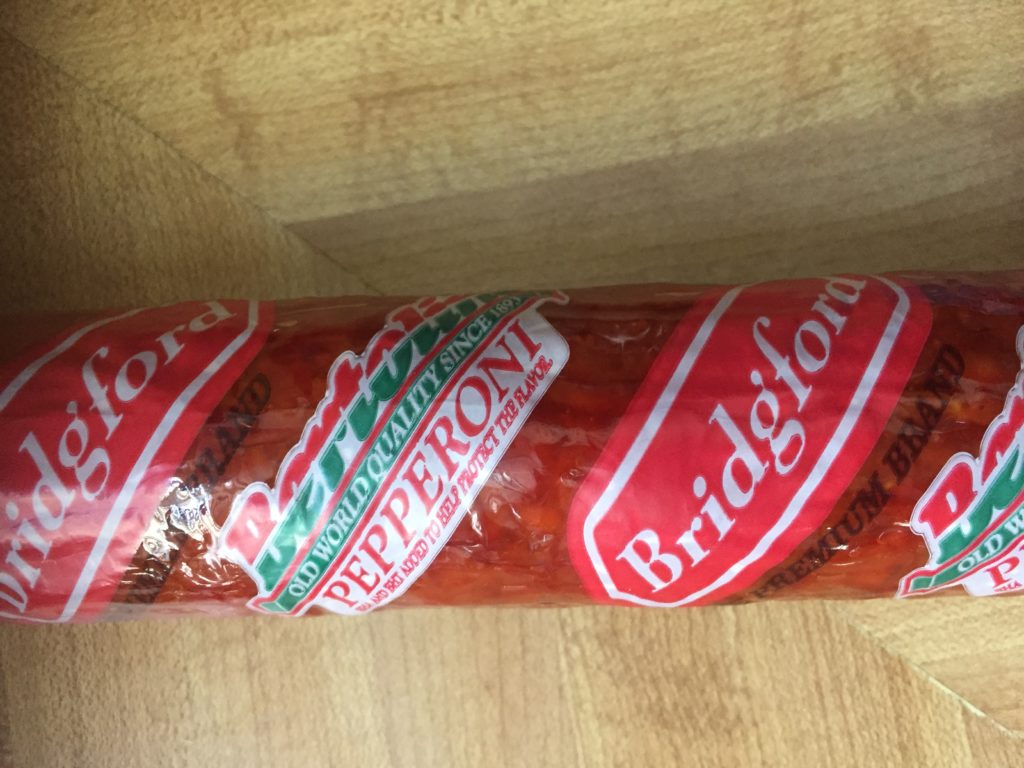
Dried meats – not sure a log of pepperoni meets this definition of a dried meat, but since it lasts about a year, we are going to add to our kit one of these. It’s something we usually buy anyway so it can be rotated in and out of the kit with replacements. The particular brand we buy, Bridgford, offers a 16-ounce stick which has 16 servings at 1 ounce each so will provide a serving a day for our family for two days. To make sure we get enough calories each day I’m going to figure on two servings a day for our family of this food. So to have enough for three days, we will buy four of these for the kit. At a cost of $6.99 each at Meijer we will pay almost $28.

Pepperoni

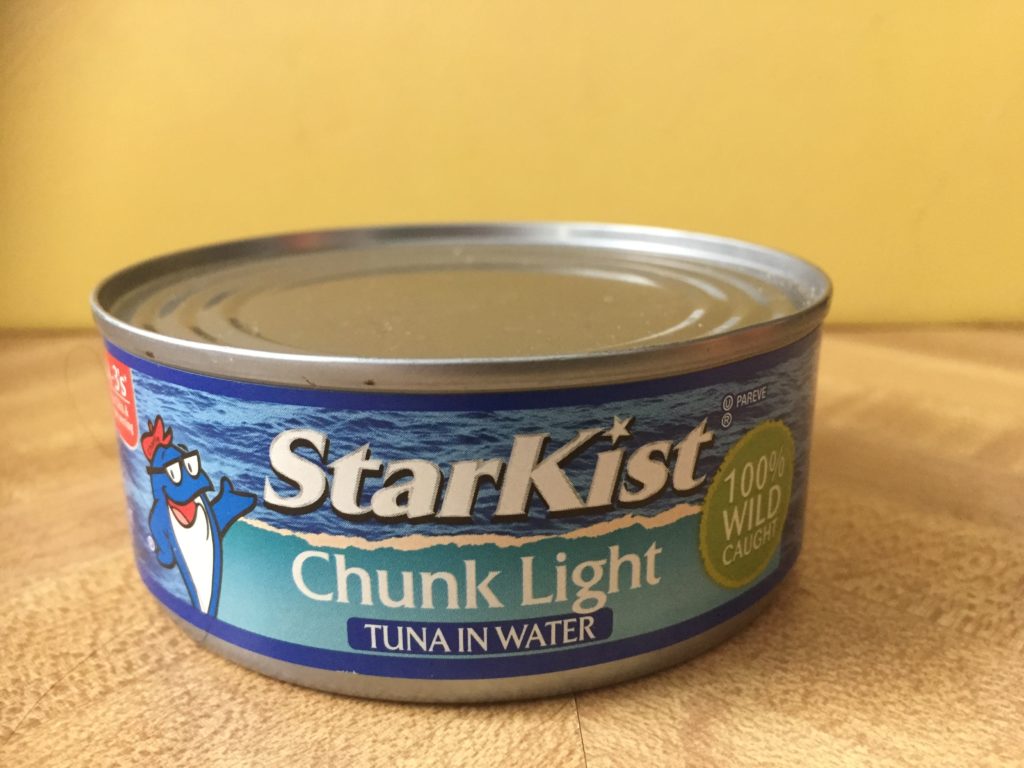
Canned seafood – just our luck this weekend, a family who was moving gave my daughter about 17 cans of tuna with an expiration date in the year 2021. With two servings a container (~45 calories a serving), this means there are 34 servings available, or a four-day supply for our family. Because of this, we won’t need to buy any additional canned seafood at this time.

Tuna

Black Beans – we regularly buy black beans so adding them to the kit allows for another item we can rotate out to keep the items fresh. We buy the Meijer brand in a 15 ounce can which has enough for about 3.5 servings (110 calories each).  For our family we would need a little over two cans a day so if we buy nine cans we should have enough. These sometimes go on sale, but if we are paying regular price, it will cost us almost $10.

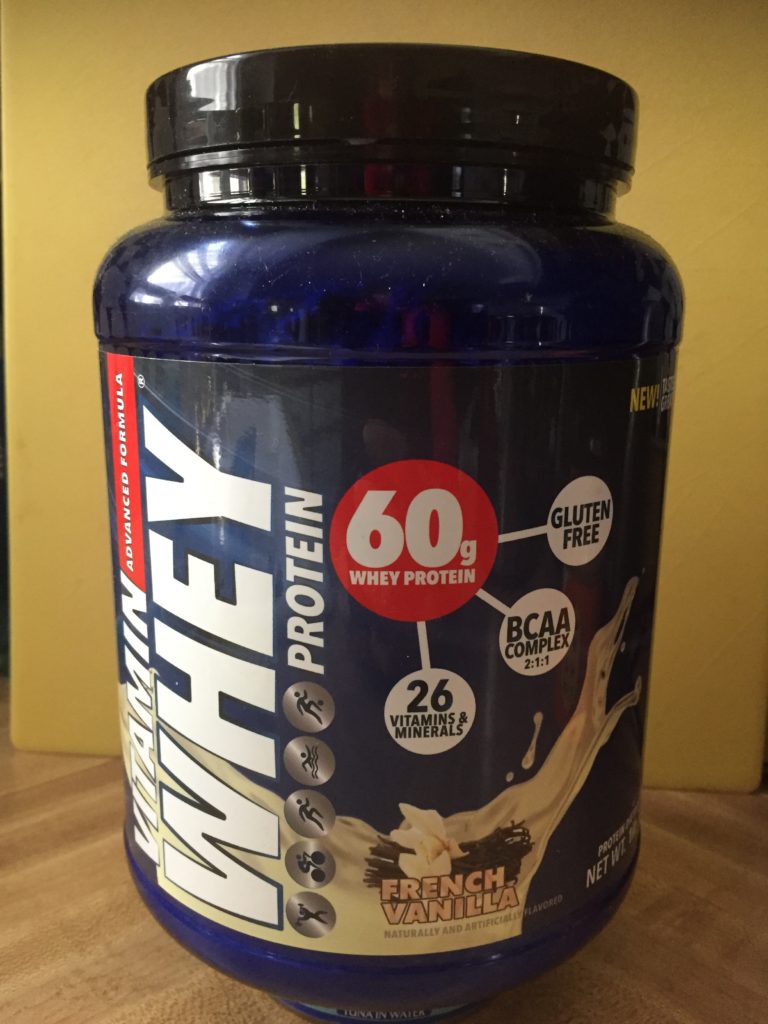
Protein Powder – because we run and regularly use protein powders for recovery, we already have a favorite brand of protein powder. The one we use is Vitamin Whey Protein which is gluten free. The container we buy has eight servings (320 calories per serving). So for our family for three days, we would need three containers. Like the water, we can rotate these out with the ones we buy for our after run drinks. We usually buy these at Meijer at $19.99 although sometimes they go on sale. If we can’t get it on sale, it will cost us close to $60 so we’ll definitely be on the lookout for sales!

Vitamin Whey Protein Powder

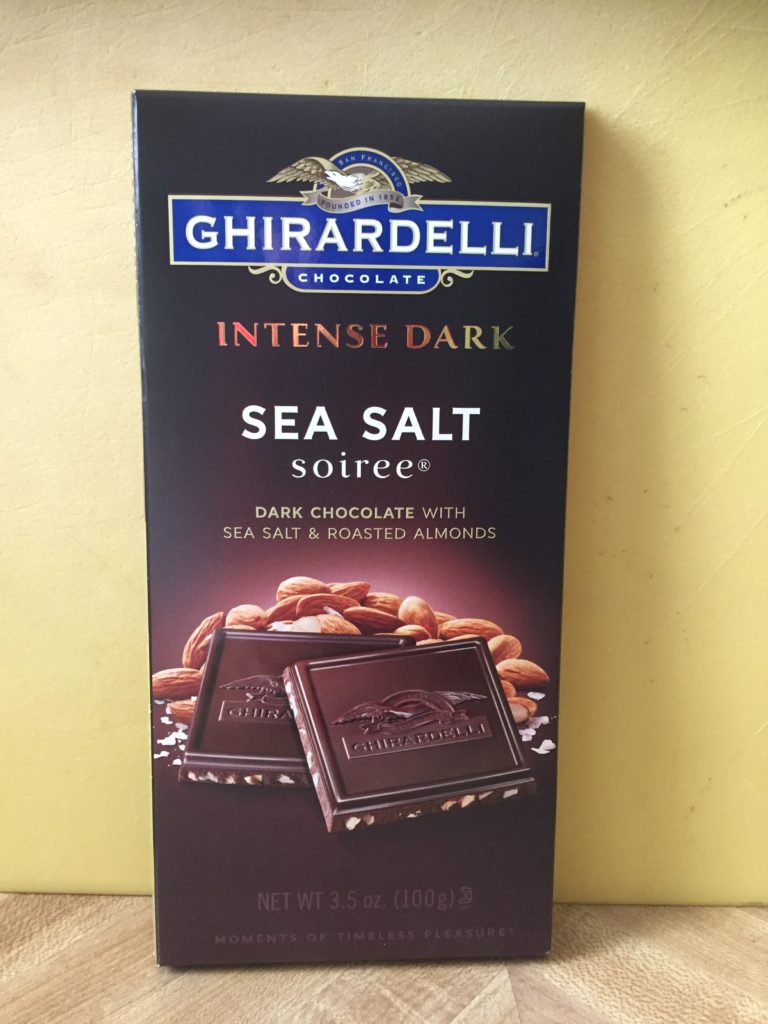
Dark Chocolate – we frequently buy Ghirardelli Intense Dark Sea Salt Chocolate Bar because it is one of the few bars which has been found to not have lead in it. Also, it seems to be gluten free even though it is not marked as such. Each bar is 3.5 ounces and has about 2.5 servings of 38 grams each (190 calories). This means we will need about 3.25 bars a day for our family or almost 10 for all 3 days. We can sometimes buy them on sale at Meijer, but if we pay the regular price of $3.09, then the total extra cost to buy 10 bars will be roughly $30.

Dark Chocolate Bar

Coffee/Tea – this is one item I am not buying extra of for the kit. We always seem to have a surplus of it, and only two or three of us drink it. I’ll probably just grab one box of tea and one of coffee and put those in the kit.

Honey – for our kit, we’ll probably buy something like Aunt Sue’s Raw Unfiltered Wildflower Honey in a 32 ounce bottle. It has 43 servings at 1 tablespoon each (60 calories) which will last our family the whole three days. One jar of this honey will cost us about $10.

Bouillon – the reason we want to add bouillon to our kit is that it can provide salt and can easily be mixed with water. A jar of cubes from Meijer makes 25 cups or enough for my family for three days of a cup a day. I’m not going to worry about the calories on this one since the amount is insignificant. Buying an extra jar at Meijer will cost about $2.

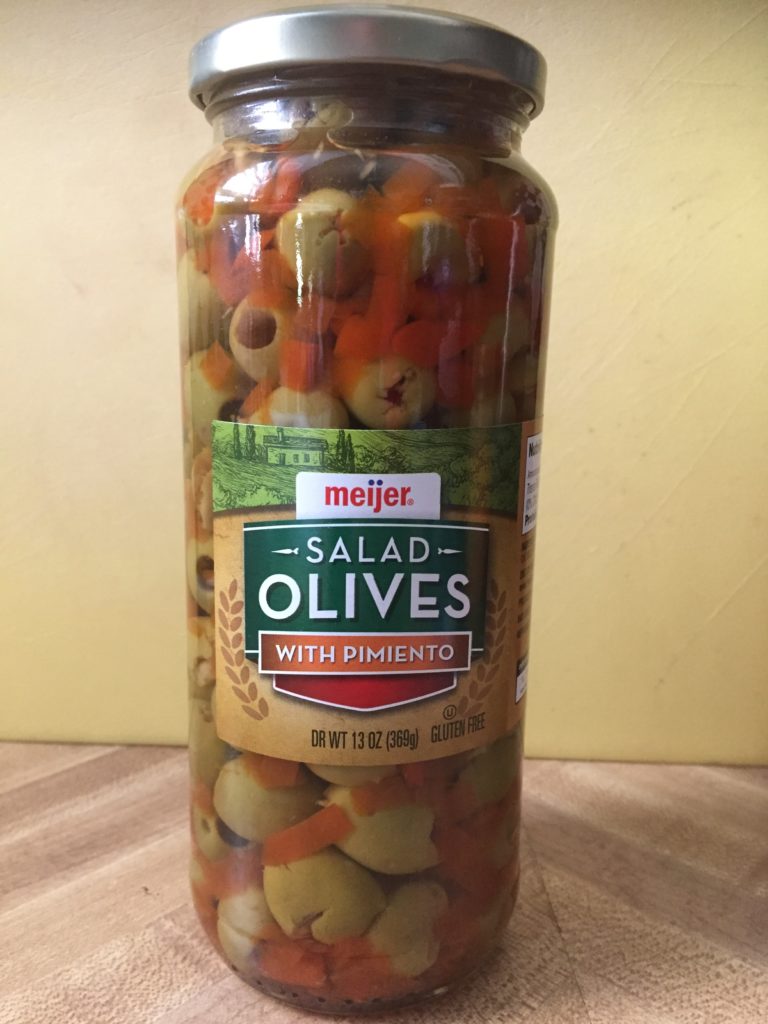
Olives – our family loves olives so we are definitely adding these to the kit, although at only 25 calories a serving, they really don’t add much to our daily total of calories. We usually buy the Meijer brand in a 13 ounce jar which has about 25 servings or enough for our family for all three days. This will cost us $2.29 to buy an extra jar next time we shop.

Jar of Olives

Salt and Vinegar – because these items really don’t provide a meal item, we will just buy one container of vinegar and one of salt. This will probably cost us about $2.50 for a 32-ounce bottle of Heinz apple cider vinegar and about $2.50 for a 26-ounce container of Morton iodized sea salt.

After reviewing all the servings and related calories, so far we would have enough food for all eight of us for three days at a total cost of about $218. Also, I only was able to get the calories up to about 1840, but figured this is probably enough. It’s probably more than most family members eat a day anyway. Below is the table I created to help me track this as I developed my list:

Food Preparedness Plan


As a side note, throughout this series of posts about getting prepared, I may mention certain products, services, agencies, etc. At no time is it my intention to promote a specific product or service or agency. Each is mentioned only for informational purposes.  Of course as a government employee, I do receive a salary from the government for the time I work on my job, but I don’t receive any compensation from any commercial entities I mention or include in these posts.

Share

Build a Kit: Water – Week 4

Week 4 - Build a Kit - Water

This week we are starting to build our preparedness kit! The first item to collect is water. The suggestion is to have one gallon of water per person per day for three days. In our house, we have 8 people so we need 8 gallons each day and would need 24 gallons for the full 3 days.

Frankly this has been one of the impediments to me building a kit. That’s a lot of water to buy and store! Also, we want to make sure we don’t have that much water sitting around forever if a disaster never occurs. So we decided we need to buy and manage the supply so it is always somewhat fresh. The decision then becomes what is the best way to buy water so we can do that.

If we buy it in one gallon containers then we need 24 of them. We can’t risk having tap water available during a disaster to fill empty containers so the safest solution is to buy them at the store and keep them in a designated spot. But the problem for our family with these containers is that they are not convenient for us to use and rotate through.

Another solution is to buy 16 oz. bottles in a case of 24. If one gallon is 128 fluid ounces then one case would be enough for one person for the full 3 days. For all eight people we would need eight cases. This seems like the best thing to do for our family since we normally buy and use a case a week and could just put the new case in the storage area and take out one of the older ones and keep rotating through the water in this manner. In eight weeks we would have replaced all the cases with new ones.

The next question was where to buy the water because I definitely did not want to spend a lot. We could just buy an extra case each week for eight weeks during our regular grocery shopping trip.  We shop at Meijer a lot – they sell a case of their brand of water for $2.79 a case so I would spend a total of $22.32. I also noticed Kroger has their brand of purified drinking water on sale for $2.29 for a case of 32 – 16.9 bottles. For a case of 32 bottles, I would only need 6 cases which would cost a total of $13.74, but there were special conditions at Kroger to get that price so I’m not sure I can do that.

Meijer Brand water on sale for $2.79 a case

At the end, we decided to make it easy on our family and budget, we will just add an extra case each week for 8 weeks since we still have 16 more weeks of building our kit anyway.

Share